The Easiest Way to Set Up Let's Encrypt SSL Certificates for Your DDNS Services Over The Internet

In most cases it is an unnecessary risk to put services running on your own server on the Internet. However, if properly protected, you can significantly reduce the risk. There is no guarantee of 100% protection, but it can be approximated.
Such services may include, among others:
- Website hosting (WordPress, or static websites with Publii, etc.)
- File manager / file transfer services (like qBittorrent, File Manager, OwnCloud, etc.)
- Monitoring services (Uptime Kuma, Grafana, etc.)
- Web based email clients
There are several things you can do to make your application more secure when you put it on the Internet. Just some of them, as that is not the purpose of this article:
- Update periodically
- Change default username
- Change the default password
Change the default port number to something between 20000 and 65000 - Disable unused services in the application
- Reduce the level of privileges as much as possible. For example, never run the application as root, or give 777 permissions to files or folders.
No one is more important than the other, it is definitely worth doing them all.
Okay, once you've done that, then it's time to add SSL to the service and make it available to the Internet.
Configure Let's Encrypt SSL
- If you don't have a DDNS service or own domain name, I'd suggest using DuckDNS or any of the supported DDNS services from this list, such as Cloudflare, DigitalOcean, and many others.
- Install Docker if you don't already have it:
curl -sSL https://get.docker.com | sh - Create a Docker container for the NGINX Proxy Manager using docker compose. If you have portainer installed, you will need to create a new stack. If you don't, create a new file called docker-compose.yml with the following content:
version: '3.8'services:app:image: jlesage/nginx-proxy-managercontainer_name: nginxports:- 80:8080/tcp # Let's Encrypt- 443:4443 # Let's Encrypt- 8181:8181/tcp # NGINX WebUI- 45367:8080/tcp # qBittorrent- 54637:3030/tcp # Grafanaenvironment:- USER_ID=1000- GROUP_ID=1000- DISABLE_IPV6=1volumes:- /Docker/nginx:/confignetwork_mode: bridgerestart: unless-stoppedcpus: 0.5mem_limit: 300M
Do not forget to modify the list of ports for your service(s), USER_ID, GROUD_ID, and the location of volume. - If you have no portainer, run the following command to start the container:
docker compose up -d
or if it failed
docker-compose up -d - Open the HOSTIP:8181 in your browser, like 192.168.1.11:8181
- Login with these:
Email: admin@example.com
Password: changeme - Change them immediately after successful login
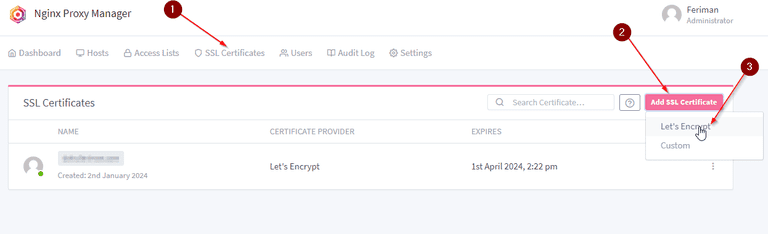
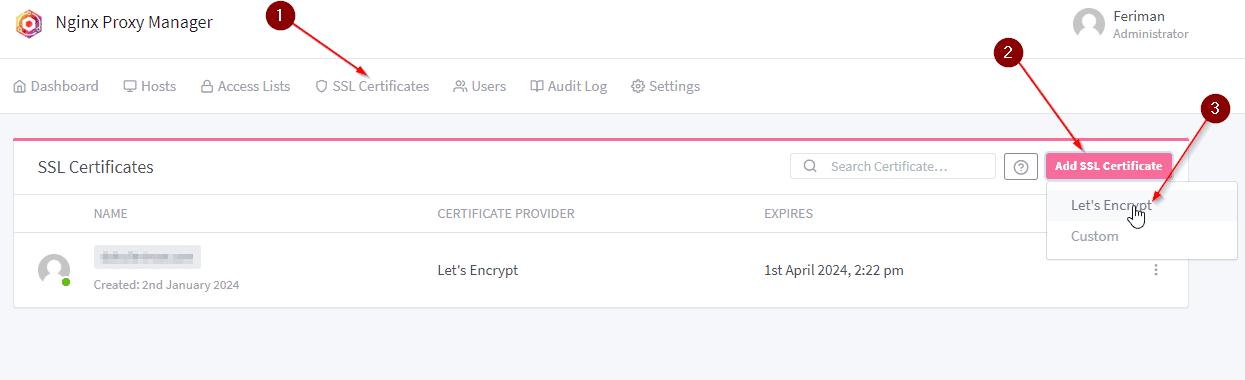
- Go to SSL Certificates (1), click on "Add certificates" (2), then select "Let's Encrypt" (3)
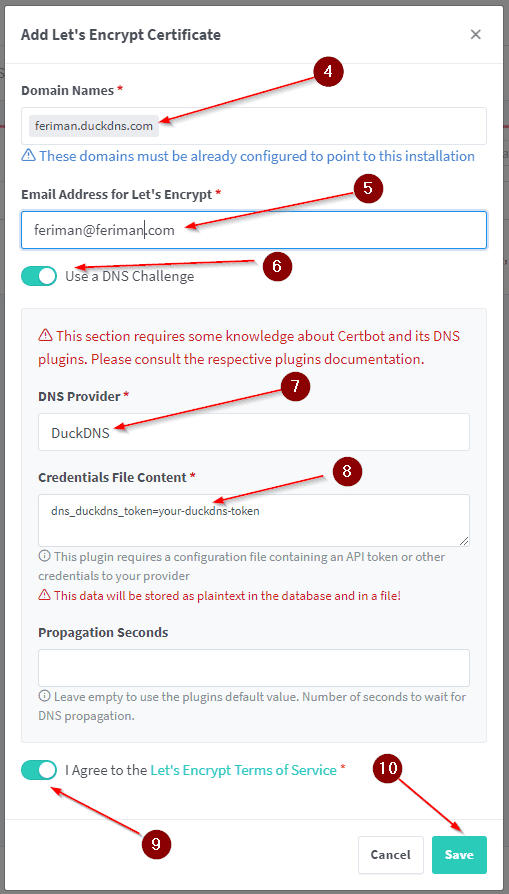
- Enter your DDNS address (4), enter your valid email address (5), enable "Use a DNS Challenge" (6), select the DNS provider (7), replace the "your-duckdns-token" from the duckdns website (8), accept the ToS (9), then save (10).

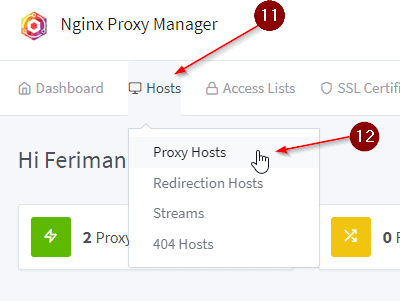
- Go to "Hosts" (11), then select "Proxy Hosts" (12)

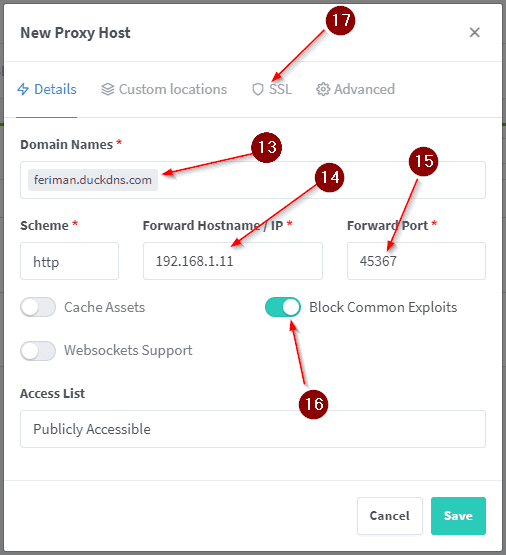
- Enter your DDNS address (13), the local IP of your server (14) and the port used by the service (15). I'd recommend enabling "Block common exploits" (16). Then go to the SSL tab (17).

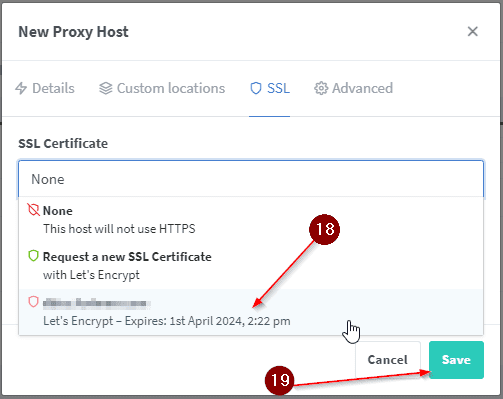
- Select the newly generated SSL certificate from the "SSL Certificate" drop-down menu (18), then "Save" it (19).

- Test the service by opening it in incognito mode. In this example, you should open feriman.duckdns.com
- That's all.
If you've found this guide valuable and appreciate the time and effort invested in creating it, please consider supporting us through options like free registrations or other no-cost methods. Your acknowledgment of the time spent is a meaningful way to show your gratitude and encourage the creation of more helpful content. Thank you for recognizing the effort put into providing you with valuable information!


Comments