
Easiest Way to Set Up Samba Sharing On Linux
Setting up Samba sharing on Linux doesn't have to be a complex and time-consuming task. In fact, it can be remarkably simple and straightforward. In this article, we will guide you through the simplest way to configure Samba sharing on your Linux system. Whether you want to share files with other machines on your network or create a centralised file server, this step-by-step guide will get you up and running in no time. Say goodbye to complicated setups and hello to hassle-free Samba sharing on Linux.
We will configure two directories, and one user:
Shared: Readable and writeable
Torrent: read-only (because you will be deleting files through the torrent client)
samba as an user. Remember for the password in #1 and #5!
Let's dive in and get started!
- Create a samba user
adduser samba - Create directories
mkdir /mnt/Torrent /mnt/Shared - Give the right permissions
chown -R samba:pi /mnt/Shared
chown -R rtorrent:samba /mnt/Torrent
chmod -R 777 /mnt/Torrent /mnt/Shared - Installing samba
apt install samba -y
Note: Say "no" to the question - Set the password for the samba user
smbpasswd -a samba
Note: I recommend using the same password as in step #1 - Set permission on the smb.conf (the main samba configuration file)
chmod 600 /etc/samba/smb.conf - Edit it
nano /etc/samba/smb.conf
[global] interfaces = 127.0.0.0/8 eth0 client min protocol = SMB3 server min protocol = SMB2 panic action = /usr/share/samba/panic-action %d server role = standalone server idmap config * : backend = tdb invalid users = root valid users = samba veto files = /lost+found/ browseable = no syslog = 0 dns proxy = no disable netbios = yes lm announce = no[Torrent] path = /mnt/Torrent veto files = /lost+found/[Shared] path = /mnt/Shared
veto files = /lost+found/ read only = No
- Enable the smbd service, and disable the unused nmdb service
systemctl enable smbd ; systemctl disable nmbd - Do not forget to restart the service
systemctl restart smbd - If you want to map the shared folder on Windows, I usually use the "Map network drive option", as this will give a letter, as a normal drive.
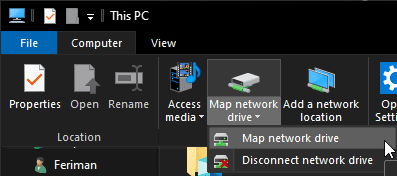
- Follow the wizard and it will look like this:

- That's all!
Trick:
Sometimes the gencache.tdb can get really big and needs to be deleted. Here's a simple script to do this:
gencachetdb="/run/samba/gencache.tdb"[ -f "$gencachetdb" ] && [ "$(stat --format=%s $gencachetdb)" -gt "10000000" ] && rm "$gencachetdb" && systemctl restart smbd
If you found this article useful and would like to show your appreciation, please consider making a small donation via PayPal. Your support will help me continue to create valuable content and make my blog even better. Thank you for your contribution!






Comments