Installing Docker on a Raspberry Pi: Quick and Easy
Ever wondered how to save time when installing specific applications on Raspberry Pi?
One solution is to write documentation yourself when installing (and later, when modifying configuration files). I did/do this, however there is another method.
A very big advantage of Docker is that you can manage specific applications as "image files" and then share them with others (or even yourself). Preconfigured apps, save a lot of time, and are sure to run the same way on all devices.
Benefits:
- Easy to manage (install/uninstall in one command, no junk left behind)
- Run anywhere, pre-configured sub-applications
- Can run in any number of instances
- Very simple backup process (Docker registry, e.g. Docker Hub)
- Combined with Kubernetes, scalable performance when using multiple Raspberry Pi
However, there is a disadvantage compared to native deployment:
- It takes up a relatively large amount of ehly to install Docker, about 230MB on the SD card, which can matter when using small cards.
Overall, I think it's very worth using, it's not a coincidence that it's so popular :)
Installation
Instead of installing the Docker with apt install docker, we will use this below command, otherwise it will cause a few issues (e.g. the docker command is not available by default)
curl -sSL https://get.docker.com | sh
The installation process will takes up to a few minutes.
Just make sure that you can use it with "pi" user:
sudo usermod -aG docker pi
Then close the current session, start a new one, and you're ready! No more steps!
Usage of Docker - Basics commands
- Pulling an Image: Before you can run a container, you need to download an image that contains the necessary files and dependencies. You can do this by using the
docker pullcommand, followed by the name of the image you want to download. For example, to download the official Nginx image, you can run the following command:docker pull nginx
- Running a Container: Once you have downloaded an image, you can use the
docker runcommand to start a container. For example, to start a container based on the Nginx image, you can run the following command:docker run -d -p 8080:80 nginx
In this command,-dtells Docker to run the container in the background,-pmaps port 8080 on the host to port 80 in the container, andnginxspecifies the name of the image to use.
- Listing Containers: To see a list of running containers, you can use the
docker pscommand. This will display a list of containers along with their status, ID, and other details.
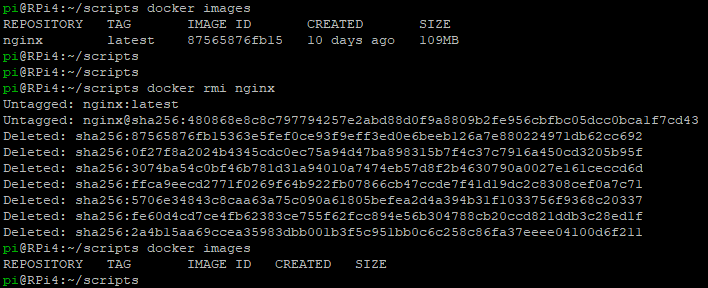
- Listing downloaded images: When you run this command, Docker will display a list of images available on your system. Each image is represented by its repository, tag, image ID, and size. To do this, you can use the following command:
docker images
- Stopping a Container: To stop a running container, you can use the
docker stopcommand followed by the container ID or name. For example, to stop a container with the ID062d4ce75d5d, you can run the following command:docker stop 062d4ce75d5d - Removing a Container: To remove a stopped container, you can use the
docker rmcommand followed by the container ID or name. For example, to remove a container with the ID062d4ce75d5d, you can run the following command:docker rm 062d4ce75d5d
- Removing an image: To remove a downloaded image (and free up a disk space), you can use the docker rmi command followed by the image ID or name. For example, to remove an image with the name
nginx, you can run the following command:docker rmi nginx
This was a very simple guide to help you get started with containerisation and save yourself a lot of time. I hope you found it useful. If you have any questions, scroll down and ask them in the comment section.


Comments