
Do you have a HomeServer? Speed up your internet connection!

What's that?
If you already have a home server or homelab set up, this one is not to be missed.
Rather than relying directly on the DNS servers of major providers such as Google or Cloudflare, you can run your own and dramatically speed up hostname resolution when browsing.
I’ll also provide a simple testing script later in the article to demonstrate the difference this makes.
Using your own local DNS server also improves privacy. It keeps your browsing history out of the hands of external providers like your ISP, Google, or Cloudflare.
What you’ll need:
- Working Docker environment
- Portainer or SSH access
- You'll also need about 20 minutes of free time.
Let's dive right in!
There are several DNS server options, but I chose dnsmasq because it’s incredibly fast and uses minimal CPU and memory resources.
Setting it up is super simple! I’ll provide all the configurations, just replace the IP address with your homeserver IP address.
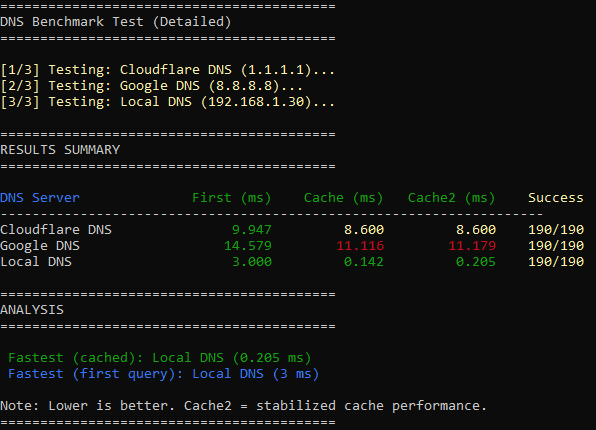
I also wrote a small DNS speed-testing script. Here’s the difference I got (this shows how much faster name resolution became):
Create files
Now, let’s create the dnsmasq configuration file (dnsmasq.conf). Place it where you will store the other files (in the example, /mnt/Docker/dns).
The version below already includes all the optimal settings, but you can tweak them as you wish.
# Upstream DNS servers (based on dnstester.sh results)
server=1.0.0.1
server=1.1.1.1
server=8.8.8.8
server=8.8.4.4

# Cache - larger size and more aggressive caching
cache-size=50000
min-cache-ttl=3600
max-cache-ttl=86400
no-negcache

# Speed optimization
all-servers
dns-forward-max=1000

# Stability
strict-order
no-resolv
no-poll
no-hosts

# Performance fine-tuning
min-port=1024
max-port=65535

# Privacy and speed - don’t forward private IP ranges
bogus-priv

# Don’t respond to non-DNS requests
domain-needed

# Logging (optional, for debugging - comment out in production)
# log-queries
# log-dhcp
Create a healthcheck.sh script. Place it where you will store the other files (in the example, /mnt/Docker/dns). Change the IP (192.1.68.1.30) to the IP address of your home server.
#!/bin/sh
# Multi-level health check for dnsmasq

DNS_SERVER="192.168.1.30"

# 1. Check if the DNS port is reachable (is the service running?)
if nc -zvu "$DNS_SERVER" 53 2>&1 | grep -q "open"; then
        exit 0
fi

# 2. If that fails, try resolving an external domain (tests upstream DNS)
if nslookup google.com "$DNS_SERVER" >/dev/null 2>&1; then
        exit 0
fi

# If none of the above worked, mark as unhealthy
exit 1
Add execute permission to this script:
chmod +x /mnt/Docker/dns/healthcheck.sh
Then set up the Docker Compose file, updating the path (/mnt/Docker/dns) to your config file, and the IP address of the homeserver as necessary.
services:
  dnsmasq:
    image: dockurr/dnsmasq
    container_name: dnsmasq
    volumes:
      - /mnt/Docker/dns/dnsmasq.conf:/etc/dnsmasq.conf:ro
      - /mnt/Docker/dns/healthcheck.sh:/healthcheck.sh:ro
    ports:
      - "192.168.1.30:53:53/udp"
      - "192.168.1.30:53:53/tcp"
    cap_add:
      - NET_ADMIN
    restart: always
    cpus: 1.0
    mem_limit: 256M
    mem_reservation: 128M
    pids_limit: 300
    healthcheck:
      test: ["CMD-SHELL", "sh /healthcheck.sh"]
      interval: 30s
      timeout: 10s
      retries: 2
      start_period: 10s
Once it’s running, test again with the script.
Afterwork
Remember to update the DNS settings in your DHCP configuration (usually in your router): set your home server’s IP address as the primary DNS server and 8.8.8.8 as the secondary DNS server.
This will ensure that your network still works fine if the Docker container ever goes down.
Enjoy faster browsing!
If you found this guide useful, please consider supporting me with a $1 donation via PayPal


Comments